Kubernetes Cluster
Table of contents
How to set up the Kubernetes Cluster
Elqano is using an Azure Kubernetes Cluster to run the web application.
This installation guide walks you trought all the steps needed to set up from scratch a Kubernetes cluster containing a complete Elqano application. It also includes the steps needed to set up the Keyvault used by the Kubernetes Cluster.
Please note that all other Azure resources need to be installed first.
The chart needs a yml file containing several configuration values to properly create the cluster. The yml configuration file will be used to define an application using argocd. Thus, on a regular basis the Kubernetes Cluster will check if the config file changes and if required, modify the conf.
Prerequisites
Install the following shell commands:
- azure CLI
- kubectl
You should probably need to login to the azure CLI in order to execute the following commands:
az login
Set up the Azure Key vault
Create a dedicated keyvault:
az keyvault create --name KEYVAULT_NAME --resource-group RESOURCE_GROUP
Add your application SSL certificate
Upload a ssl certificate for your application fully qualified domain name (FQDN) to the newly created Azure keyvault:
az keyvault certificate import -f CERT_FILE_NAME -n CERT_NAME --vault-name KEYVAULT_NAME
The certificate cannot be self signed, otherwise the teams callback does not work. If you are deploying the application on the elqano.com domain, you can download the elqano provided certificate (Note: you should download the certificate in PFX/PEM format)
Add components secrets to the Keyvault secrets
Postgres SQL Database
| component | credential | credential name | credential storage location |
|---|---|---|---|
| Postgres | postgres connection url | POSTGRES-URL-DEV | Azure Keyvault secrets |
Note down the password used to create the database, since you need it to create the psql connection string
Once the postgres resource is created, you should go on the reource overview page and retrieve:
- Server name
- Admin username
You should than create the connection string as follow: postgres://{Admin username}:{password}@{Server name}:5432/elqano_qa
Note: often the Admin user name is in the form: user@server, in this case you should url-encode it to user%40server
Once the url connection is string is built, you can set the secret value inside the keyvault:
| component | credential | credential name | credential storage location |
|---|---|---|---|
| Azure Storage | access key | AZURE-STORAGE-ACCESS-KEY-DEV | Azure Keyvault secrets |
| Azure Storage | storage name | AZURE_STORAGE_ACCOUNT_NAME | Kubernetes template |
Retrieve the acces key, either on the azure portal, on the storage resource under Acces Keys, or by using this az cli command:
az storage account keys list -g RESOURCE_GROUP -n STORAGE_NAME --query "[0].value" -o tsv
Once you retrieve the access key, set it in the keyvault:
az keyvault secret set --vault-name KEYVAULT_NAME -n AZURE-STORAGE-ACCESS-KEY-DEV --value ACCESS_KEY
Elastic Search
As a reminder, here are the required information needed by the Kubernetes Cluster to access the Elastic Search index
| component | credential | credential name | credential storage location |
|---|---|---|---|
| Elastic search | private key for the Elastic Search App search service | ELASTIC-SEARCH-KEY-DEV | Azure Keyvault secrets |
| Elastic search | search engine name | ELASTIC_SEARCH_ENGINE | Kubernetes template |
| Elastic search | search url | ELASTIC_SEARCH_URL | Kubernetes template |
Retrieve the Elastic search private key and set it in the keyvault:
az keyvault secret set --vault-name KEYVAULT_NAME -n ELASTIC-SEARCH-KEY-DEV --value ELASTIC_SEARCH_KEY
Rails secret
Once the the rails secret ket and the secure attribute are generated (by Elqano engineers), store it on the keyvault:
az keyvault secret set --vault-name KEYVAULT_NAME -n SECRET-KEY-BASE-DEV --value SECRET_KEYaz keyvault secret set --vault-name KEYVAULT_NAME -n SECURE-ATTRIBUTE-KEY-DEV --value SECURE_ATTRIBUTE
Elqano’s docker registry password
Since the AKS cluster and Docker Registry containing the images can lives in two different tenants, it is not possible to use a managed identity to give the permission to the AKS cluster to pull the images from the Registry. Instead, the AKS cluster needs to use the credentials stored in the DOCKER-REGISTRY-SERVER-PASSWORD-DEV keyvault secret to pull the image.
The secret should be in the form: {“auths”:{“elqanoqa.azurecr.io”:{“username”:”elqanoqa”,”password”:”••••••”}}}
Once the Elqano team provided you the password, add it to the keyvault:
az keyvault secret set --vault-name KEYVAULT_NAME -n DOCKER-REGISTRY-SERVER-PASSWORD-DEV --value DOCKER_REGISTRY_VALUE
Set up the Kubernetes cluster
Create the Kubernetes cluster
Use this command to create the AKS cluster:
az aks create -n AKS_CLUSTER -g RESOURCE_GROUP --network-plugin azure --enable-managed-identity -a ingress-appgw --appgw-name APP_GW --appgw-subnet-cidr "10.225.0.0/16" --generate-ssh-keys
For more information, please consult these pages:
- Deploy an Azure Kubernetes Service cluster using the Azure CLI
- Enable the ingress controller add-on for a new AKS cluster with a new application gateway instance
Once the cluster is created, get kubeconfig locally to enable kubectl connexion:
az aks get-credentials --resource-group RESOURCE_GROUP --name AKS_CLUSTER
And test that you are connected:
kubectl get deployments --all-namespaces=true
Sync the cluster with the Key vault
For more details see the azure documentation
Use the cli command to enable CSI secret sync:
az aks enable-addons --addons azure-keyvault-secrets-provider --name AKS_CLUSTER --resource-group RESOURCE_GROUP
Use the az cli commands to retrieve the AKS cluster agent pool objectID:
az aks show -g RESOURCE_GROUP -n AKS_CLUSTER --query identityProfile.kubeletidentity.objectId -o tsv
Update the key vault access policy with secrets & certificat management with objectID:
az keyvault set-policy -n KEYVAULT_NAME --secret-permissions get list --certificate-permissions get list --object-id objectID
Fill the Kubernetes template values
Azure info
Provide the following values to the Elqano team so the yml values file is updated.
- TenantId
- ClientId
- KeyvaultName
- CertName
To get the TenantId:
az account show --query tenantId -o tsv
To get the ClientId:
az aks show -g RESOURCE_GROUP -n AKS_CLUSTER --query identityProfile.kubeletidentity.clientId -o tsv
Fully qualified domain name
Provide the actual fqdn of your application to the elqano team so the yml values file is updated. Write down certificate name.
Azure Storage
You should also provide the correct value for AZURE_STORAGE_ACCOUNT_NAME so it can be added in the yml values file.
Deploy using ArgoCD
Setup ArgoCD
Create argocd namespace & install argocd:
kubectl create namespace argocdkubectl apply -n argocd -f https://raw.githubusercontent.com/argoproj/argo-cd/stable/manifests/install.yaml
Once the elqano team provides the dockerconfig.json file, create a new secret directly within the Kubernetes cluster so the elqano images can be retrieved:
kubectl create secret generic regcred --from-file=.dockerconfigjson=dockerconfig.json --type=kubernetes.io/dockerconfigjson
Access ArgoCD
Retrieve the ArgoCD password:
kubectl -n argocd get secret argocd-initial-admin-secret -o jsonpath="{.data.password}" | base64 -d; echo
The username to use is:
- admin
Note: You can write down the argocd-initial-admin-secret and delete it right away
Port forward ArgoCD to a localhost:
kubectl port-forward svc/argocd-server -n argocd 8080:443
You can now access ArgoCD on your localhost:8080
Create your app
Access to the repositories argo cd page 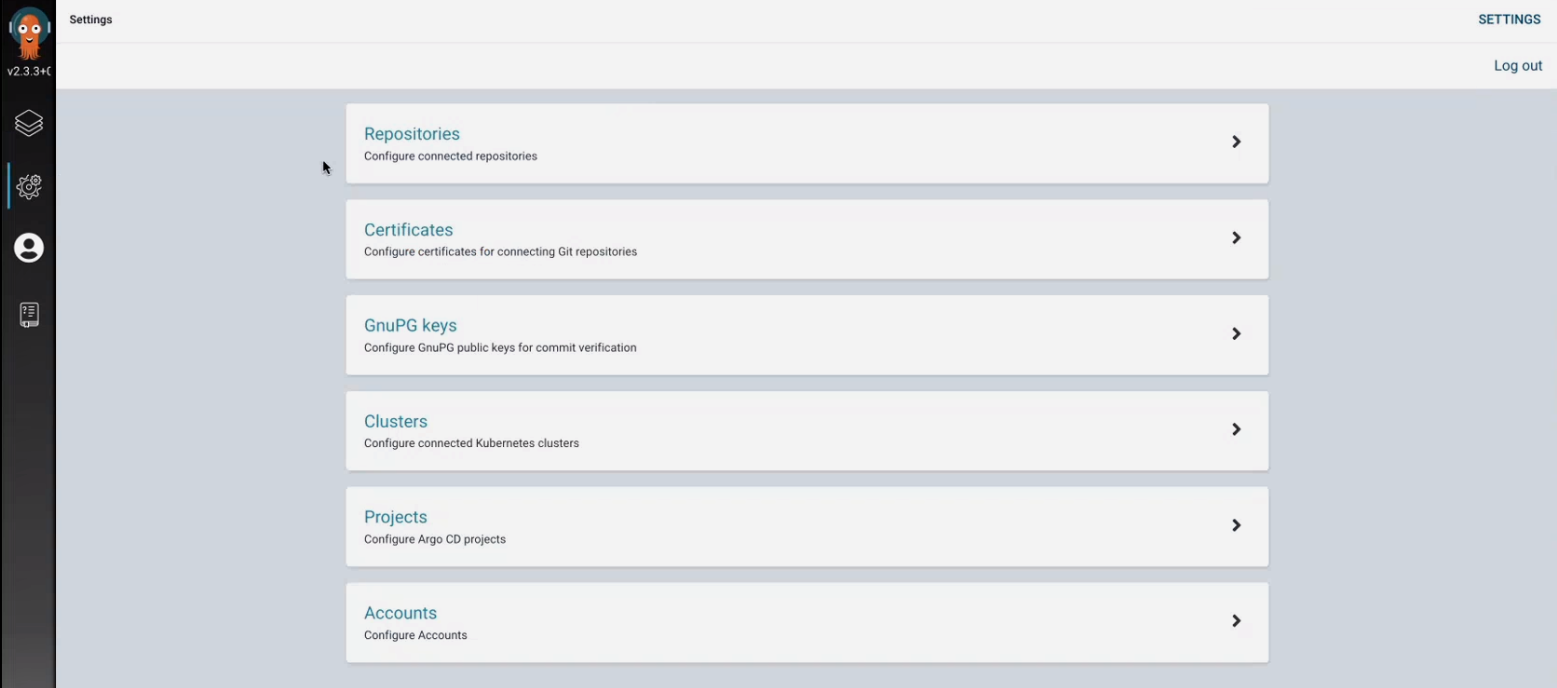
Click on repositories and then connect repo using ssh 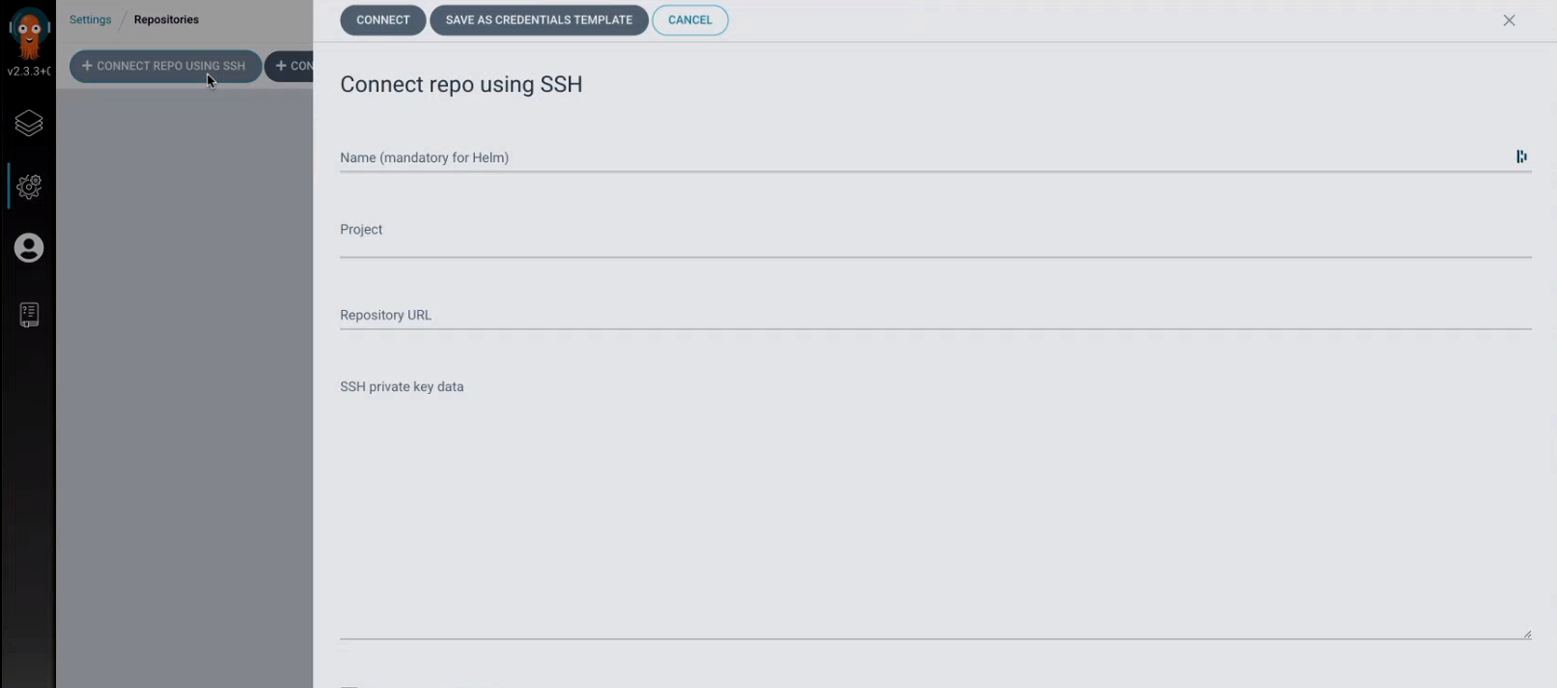
Then connect the cluster to Elqano private repository where the yml config file will be hosted:
- Use the Elqano provided repository URL
- Generate SSH keys using (you can use do it online if you want)
- past the private key in the repo page as shown in the example below
- Provide the public Key to the elqano team so developpers can add it to the Kubernetes repo.
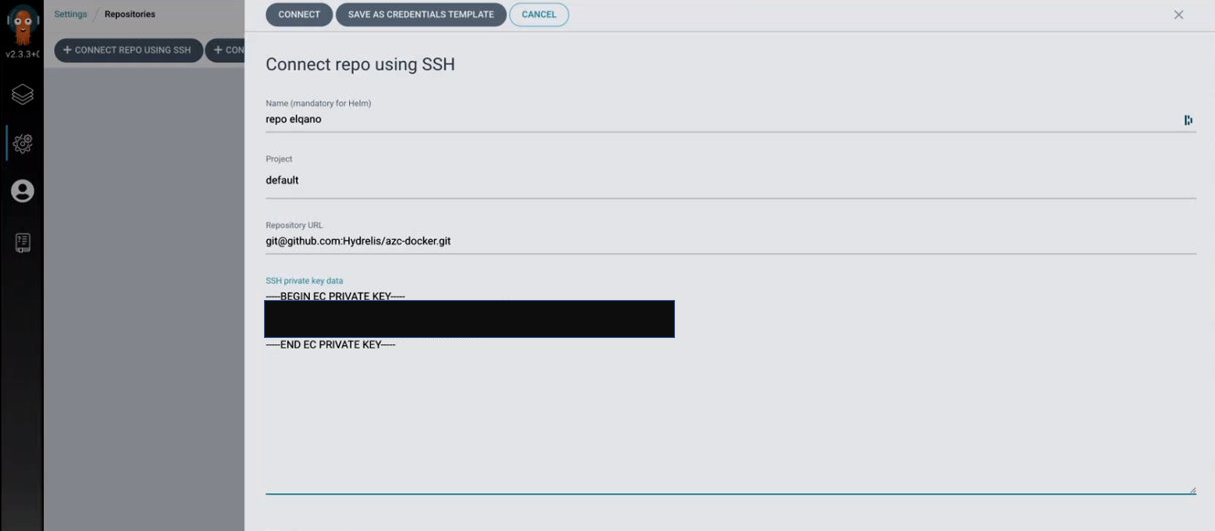
You should now see the repo appear with a successful connection status

Now, you have to create the argocd application. Start by clicking on New app.

Fill the corresponding config but replace the yml file name with the one provided by the Elqano team.
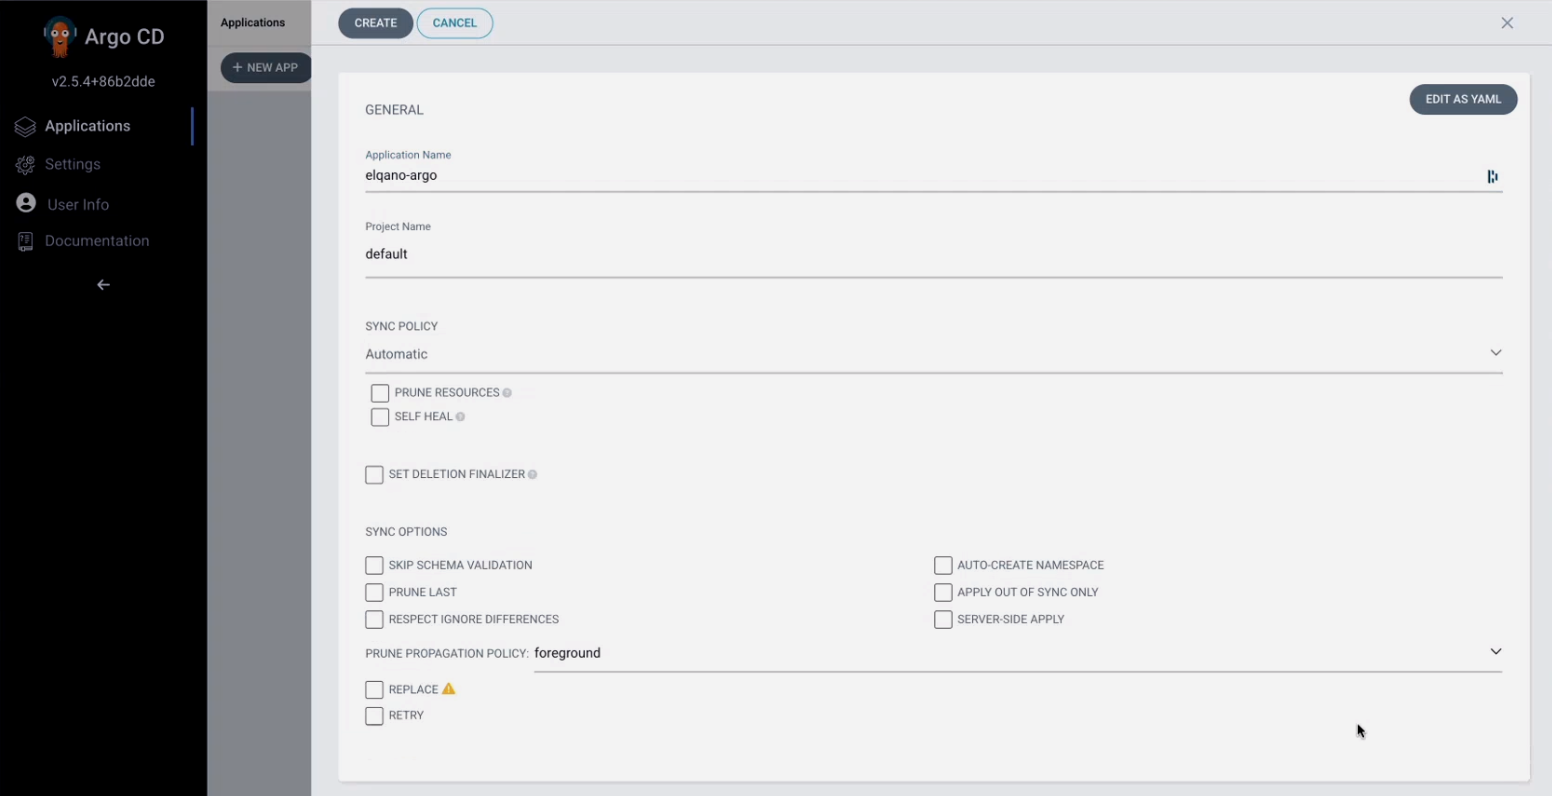


Click on create. You should now see the app being created.
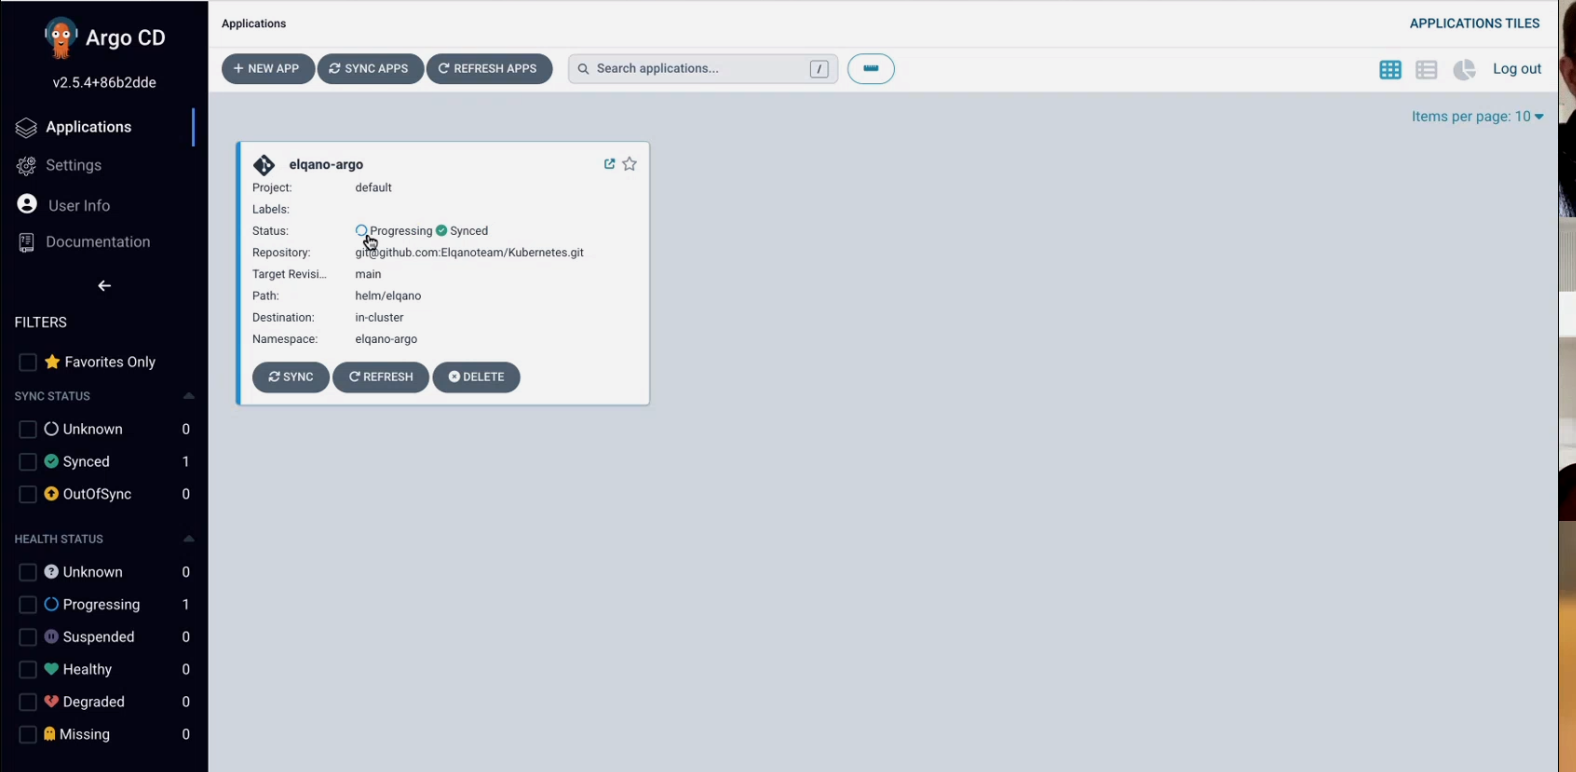
You can click on the app and investigate all the pods, replica sets etc.
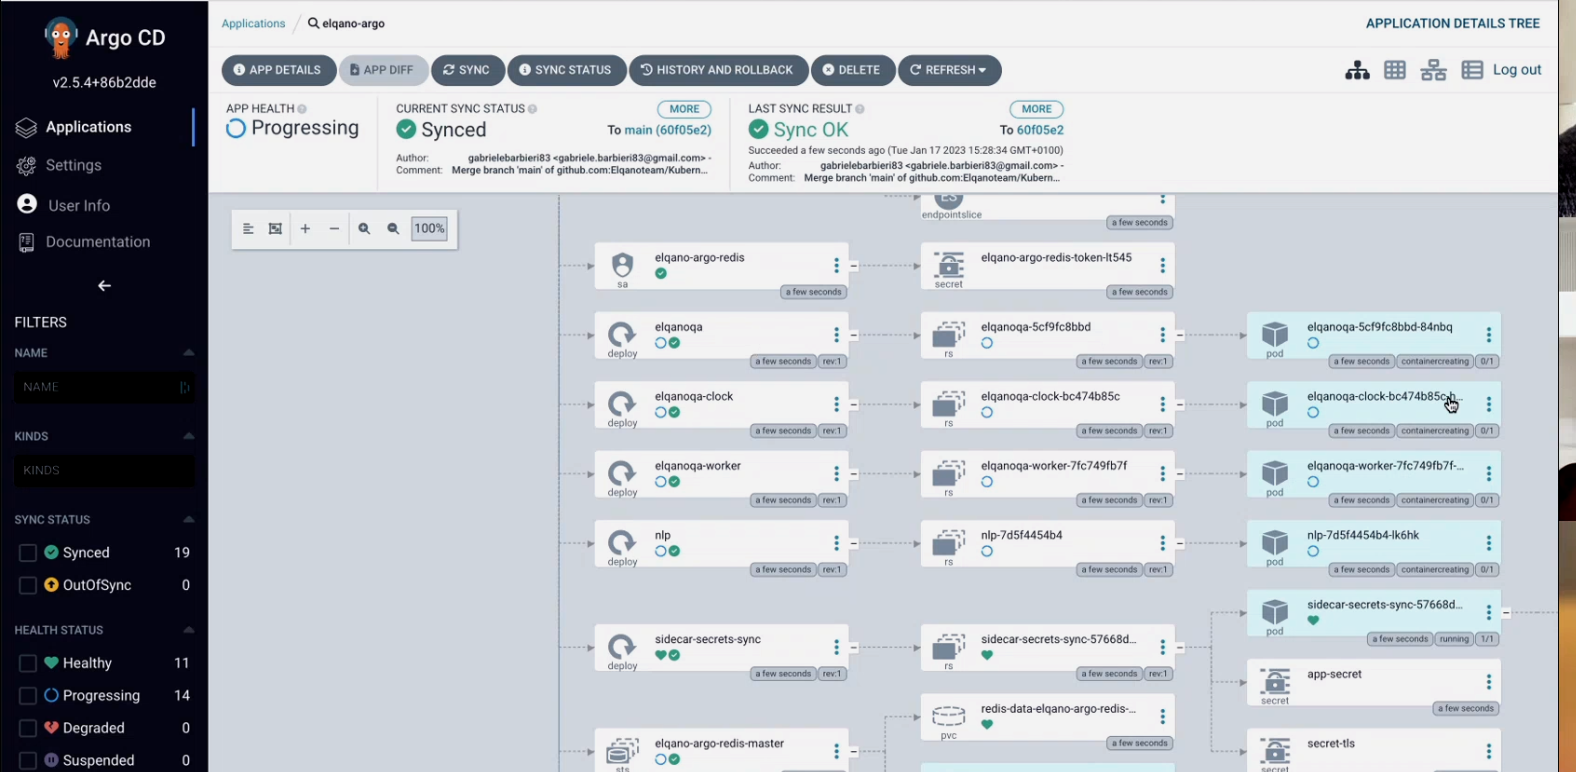
Please note that if you change keyvault secret values you will have to delete the sidecar-secrets-sync replica set so the changes propagate. To do so you just need to click on the three dots.